Build with AI
Use pre-built prompts, reference Apify docs via llms.txt, and follow best practices to build Actors efficiently with AI coding assistants.
You will learn several approaches to building Apify Actors with the help of AI coding assistants. This guide includes independent instructions, tools, and best practices that you can use individually or combine together. Each section focuses on a specific part of the process such as prompt usage, Actor templates, Apify MCP server tools, or documentation integration, so you can follow only the parts that fit your development style.
AI coding assistant instructions
Use the following prompt in your AI coding assistant such as Cursor, Claude Code or GitHub Copilot:
The prompt guides AI coding assistants such as Cursor, Claude Code or GitHub Copilot to help users create and deploy an Apify Actor step by step. It walks through setting up the Actor structure, configuring all required files, installing dependencies, running it locally, logging in, and pushing it to the Apify platform and following Apify’s best practices.
Quick Start
- Create directory:
mkdir my-new-actor - Open the directory in Cursor, Claude Code, VS Code with GitHub Copilot, etc.
- Copy the prompt above and paste it into your AI coding assistant (Agent or Chat)
- Run it, and develop your first actor with the help of AI
The AI will follow the guide step-by-step, and you'll avoid copy-pasting from tools like ChatGPT or Claude.
Use Actor templates with AGENTS.md
All Actor Templates have AGENTS.md that will help you with AI coding. You can use the Apify CLI to create Actors from Actor Templates.
apify create
If you do not have Apify CLI installed, see the installation guide.
The command above will guide you through Apify Actor initialization, where you select an Actor Template that works for you. The result is an initialized Actor (with AGENTS.md) ready for development.
Use Apify MCP Server
The Apify MCP Server has tools to search and fetch documentation. If you set it up in your AI editor, it will help you improve the generated code by providing additional context to the AI.
We have prepared the Apify MCP server configuration, which you can configure for your needs.
Provide context to assistants
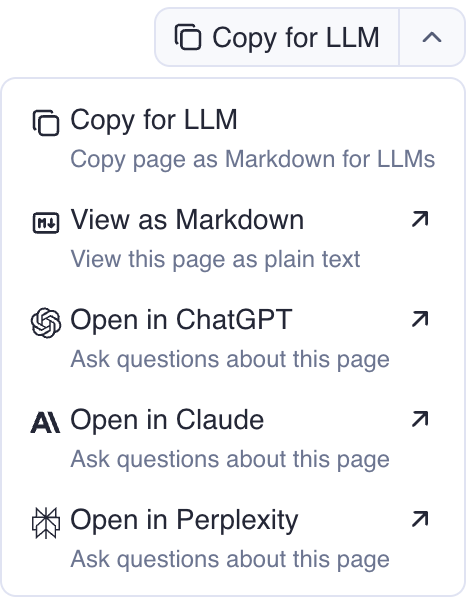
Every page in the Apify documentation has a Copy for LLM button. You can use it to add additional context to your AI assistant, or even open the page in ChatGPT, Claude, or Perplexity and ask additional questions.
Use llms.txt and llms-full.txt
Search engines weren't built for Large Language Models (LLMs), but LLMs need context. That's why we've created llms.txt and llms-full.txt for our documentation. These files can provide additional context if you link them.
| File | Purpose |
|---|---|
llms.txt | Contains index of the docs page in Markdown, with links to all subpages in Markdown. |
llms-full.txt | Contains a full dump of documentation in Markdown. |
LLMs don't automatically discover llms.txt files, you need to add the link manually to improve the quality of answers.
Best practices
-
Small tasks: Don't ask AI for many tasks at once. Break complex problems into smaller pieces. Solve them step by step.
-
Iterative approach: Work iteratively with clear steps. Start with a basic implementation and gradually add complexity.
-
Versioning: Version your changes often using git. This lets you track changes, roll back if needed, and maintain a clear history.
-
Security: Don't expose API keys, secrets, or sensitive information in your code or conversations with LLM assistants.